There exists a numerous number of vegetables, whose Microgreen variants serve as a nutritious and flavorful accompaniment to your salads and smoothies. The fast turnaround time for the harvest to reach your table is the reason why you should consider growing microgreens at home.
Even if you do not have the time and space for gardening, you can still easily grow microgreens at home in varied climatic conditions in India. The importance of home-grown and pesticide-free food cannot be emphasized enough, in the current ongoing scenario of food practices in India and around the world. With Microgreens gaining popularity as a superfood, more and more people are growing them at home. And surprisingly, Microgreens are extremely easy to grow!
What Are Microgreens?
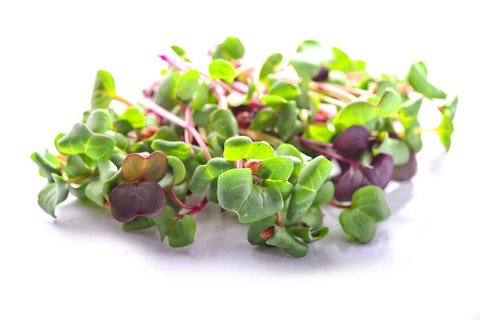
Microgreens are the first true leaves produced from a seedling of vegetables and herbs that are about 2-3 inch tall. There are so many varieties of plants including turnips, radishes, broccoli, cauliflower, carrots, celery, chard, lettuce, spinach, arugula, amaranth, cabbage, beets, parsley and basil, to name a few, that can be grown as a microgreen for a wholesome and nutritious addition to your daily meals. The tiny leaves of most of the microgreens get ready for harvest in 12 to 14 days and are packed with nutrition and intense flavours imitating their mature counterparts. For example, if you are eating the microgreen shoots of radish, the taste and flavour will be a lot like a radish. Similarly, beetroot microgreens taste just like beetroot and coriander microgreens taste like coriander.
Microgreens contain considerably higher levels of vitamins and carotenoids - about five times on an average - than their mature counterparts. Such soaring levels of nutrients help lower the risk of cancer, Alzheimer's, osteoporosis and boost heart health.
Microgreens first made their appearance as a garnish in the early 80s but soon caught up as the healthiest trend due to their nutritional superpowers. Microgreens in India, however, are still at the outset of becoming a part of our daily diet. The fine-dine restaurants in metro cities like Delhi, Bengaluru, Mumbai have recently started adding microgreens to their salads, appetizers, sandwiches, desserts, mocktails and such.
Microgreens are ideal for you if you are struggling with time and space for your garden but want to start eating healthy. Some of the reasons for growing your own batch of this superfood are:
1. Easy to Grow:
Microgreens are incredibly easy to grow due since they are harvested at the first true leaf stage and can be grown effortlessly on a sunny windowsill.
2. Quick to harvest:
Microgreens get ready to eat in just two weeks.
3. Packed with flavours:
Though microgreens are tiny, the concentration of flavours makes them a favourite of chefs and food lovers around the world.
4. Loaded with nutrients:
According to a study done by University of Maryland, microgreens have a higher concentration of nutrients than mature vegetables and herbs with some microgreen varieties having up to 40 times more nutrition than grown vegetables.
Microgreen Seeds
For growing a particular Microgreen, it is advisable to take Microgreen seeds specifically, instead of mature vegetable seeds. Microgreens cannot be grown from regular seeds, you should use microgreen seeds only. You can order over 7 different varieties of Microgreens seeds online from Plantshop.me.
Potting Soil
Planting Soil works the best, but you may use any soil from your garden too. The soil should not contain any chemical or pesticide quantities, in order to grow Microgreens organic and healthy.
Pot/Tray
You will require a container to grow your Microgreens in. A seed tray is available at any hardware store or a nursery. A regular planting pot or a baking dish that is 4-5 inches deep will also solve the purpose.
Light Source
Microgreens require an essential amount of sunlight and natural light for at least 3-4 hours a day. A bright windowsill or a balcony that receives sunlight will be a good spot for your plant.
Water
Water is a necessary element for Microgreens. The soil being used is to be kept moist at all times. A hand sprinkler works best for the plant, due to its micro outlets that do not let open a huge downpour of water. We recommend you to use fresh tap water instead of any chemically treated water for your Microgreens.
Here are the easy step-by-step instructions you can follow to grow your very own batch of fresh, flavoursome and healthy microgreens.
1. The first step is filling the tray/container with soil. Since the roots of Microgreens do not reach that deep, 3-4 inches soil height should be good enough.
2. After the soil is ready, Microgreen seeds are to be spread on the soil surface. The spacing between the seeds does not need to be completely even, so hand sprinkling works fine.
3. Now cover the seeds with a very thin layer of soil and gently pat the surface in order to make the seeds settle well in the container.
4. The Next Step would be making the soil damp with water. Spray enough water over the soil surface in order to make the surface completely moist, but do not flood it with water.
5. The container can be kept at room temperature for about two days until germination occurs. Then choose a sunny spot to place the plant, where it receives a good amount of sunlight for at least 3-4 hours in a day.
6. Sprinkle a little water over the growing greens, twice a day. In 3-4 days time, you will observe small leaves growing over the soil with little shoots at the bottom.
7. After a week, you will be thrilled to see your container full of healthy Microgreens. Once the plants are 2-3 inches taller, they are ready to be harvested. You can wait a little longer as well if you prefer taller shoots.
8. Harvesting Microgreens is pretty hassle-free too. You can take a pair of scissors or a sharp knife and cut the Microgreens, holding them vertically, from just over the roots.
9. After collecting your Microgreens, wash them with cold running water and they are ready to enhance your meal! Microgreens provide the best of nutrition when consumed fresh, right after the harvest. You can also dry them after washing and store them in a paper wrap in your fridge, for further use.
10. See, it's super easy, right? Enjoy growing your Microgreens and once you have got the hang of growing these, you’ll love having them as a healthful ingredient in your salads, smoothies, and sandwiches.
Easiest Microgreens to Grow at Home
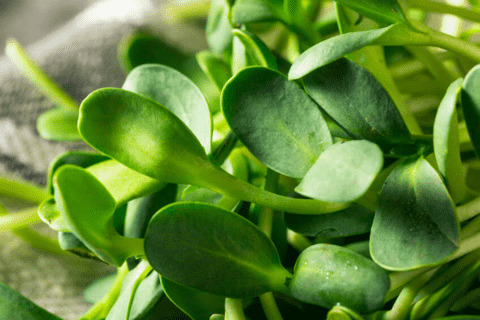
Microgreens can be grown almost everywhere without much effort and are fast taking over the healthy kitchens around the globe. Let’s look at how some of the easiest varieties of microgreens to grow that can be transformational in improving your health for the better.
1) Rocket Microgreen
Rocket is a part of the larger brassica plant family. Packed with antioxidants, Vitamins A, C, K, Calcium, Folate, Iron, Magnesium, Phosphorus, Beta Carotene, and cancer-fighting phytochemicals. Add the rocket microgreen leaves to your favourite pizza for a peppery taste. Arugula or rocket microgreen seeds can germinate in room temperature and grow faster in cooler weather.
2) Broccoli Microgreen
The anti-inflammatory properties of broccoli microgreens will help reduce toxins in the body. Broccoli microgreens are packed with vitamin A, C, E, K, protein, and calcium including significant amounts of iron, magnesium and phosphorus. Spread a handful of broccoli microgreens on your soup, smoothie or sandwich to get the best of this versatile green. Broccoli microgreens seeds will grow best in soil based medium and will be ready for harvest in 8 to 10 days.
3) Garden Cress Microgreen
Garden cress microgreens are a great way to add the much needed spicy and fresh flavours to your sandwiches and salads. These microgreens contain all the essential amino acids, Vitamins A, B, C & E, Potassium, Phosphorus, Calcium, Magnesium, Iron, Niacin and antioxidants. Add a handful of Garden Cress microgreen shoots to your appetizers to see the difference. The Garden cress microgreen seeds will start germinating in 3-4 days. Remember not to dampen the seeds with too much water initially or you will end up with very low germination.
4) Pak Choi Microgreen
The mild and slightly mustard like the taste of pak choi microgreens makes them a great choice for garnish. Relatively easier variety of microgreen to grow, Pak choi microgreen is full of Vitamin E, C, K, Iron and Beta-carotene and is good for lower cholesterol, improving heart and bone health. Pak Choi microgreen seeds are sensitive to light conditions and must be kept in low to medium light only.
Once you get familiar with growing these easy to grow microgreens, you can try your hands on growing slightly medium and harder to grow microgreens like Basil, Carrots and Amaranthus.
Microgreens provide the best of nutrition when consumed fresh, right after the harvest. You can also dry them after washing and store them in a paper wrap in your fridge, for further use. And consuming microgreens, too, is easier than any other greens since after a wash you can just sprinkle them over your food and eat them raw.